Sensitive research data: analysis via SD Services
We are conducting a research project focused on analysing sensitive research data (e.g., consented data). Our analysis includes various data types, such as:
- Videos & audio recordings
- Spreadsheets & questionnaires
- Genomic data
Since our team has no programming experience, we need an intuitive, user-friendly web interface with familiar software. Additionally, we require an isolated environment provided by CSC to securely store and analyse the data.
We will access the service on demand, as our analysis occurs only once a week. However, one of our collaborators, from a different organization, will analyse part of the data programmatically using a specific script.
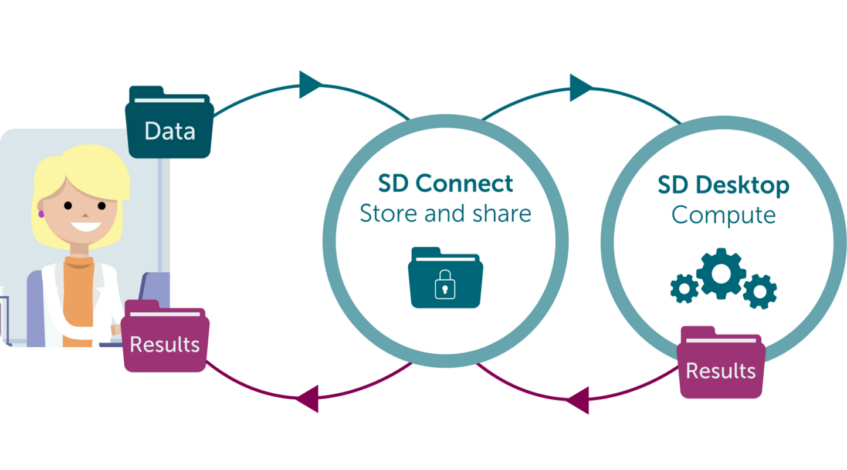
CSC offers services for managing data in all phases of the research project. As in this case, we are analysing sensitive data, we can use:
- MyCSC portal for creating an account, set up a CSC project, and access the SD Connect and SD Desktop service.
- Sensitive Data Connect (SD Connect) for automatically encrypting and uploading sensitive data to CSC (via interface or programmtically).
- Sensitive Data Desktop (SD Desktop) for creating your private virtual desktop (or virtual computer) for data analysis, shared with all the project members that belong to your research project.
If you are new to CSC’s services, it may take around three days to familiarize yourself with our services. If you encounter any issues, please don’t hesitate to contact us, we can support you step-by step during this process, for example via online meetings.
Create CSC account
Create a CSC account and activate SD Connect and SD Desktop from your account. As part of the initial setup, you also need to apply for resources, add project members and activate the second verification step on your profile. These steps are only required once when setting up your account.
Accessing Sensitive Data services (Docs)Data Protection
When accessing your project, you need to complete the Description of Processing Activity form if your project handles personal data, ensuring compliance with European data protection regulations. If transferring data outside the EEA, confirm legal requirements; for assistance, consult your organization’s legal office using documents provided here.
Data protection (Docs)Upload data to SD Connect
Next we log in to SD Connect and upload files or folders. Files will be encrypted automatically. After upload, we can than share the folder with our collaborators, and they will be able to download and decrypt the files.
SD Connect service description Upload data to SD Connect (Docs)Create and customise your virtual desktop with SD Desktop
We can set up a virtual desktop (or virtual computer) that will be accessible to all project members whenever they use the service. Additionally, the virtual desktop can be customised by importing specific software, either provided by CSC (no experience required) or prepared programmatically by you (advanced). Note: Only open-source software is available in SD Desktop.
SD Desktop service description Create virtual desktop (Docs) Access virtual desktop (Docs) Work with your virtual desktop (Docs) Customising virtual desktop by adding software (Docs)Import a copy of the data stored in SD Connect to SD Desktop for analysis
Once your virtual desktop is set up, you can import files from SD Connect and save them to an external volume. The service will automatically decrypt the files, making them available for analysis. When not in use, the desktop can be paused to optimize resources.
Import data to virtual desktop (Docs) Manage virtual desktop (Docs)Export results from SD Desktop
Once the analysis is complete, the Project PI (also referred to as the CSC Project Manager) can export the results from the virtual desktop.
Export data from virtual desktop (Docs)Close you project (data retention)
When your analysis is completed, you can delete the virtual desktop and any copies of data imported to it. The original dataset stored in Sd Connect can be submitted for publication under controlled access (e.g., via Federated EGA or other CSC services). The default lifetime of a CSC project is one year. You will receive an email notification via the MyCSC portal when your project is nearing expiration. Once the project is expired or is closed all data, including files, virtual desktops, and volumes stored in SD Connect or SD Desktop, will be permanently deleted 90 days after project closure or expiration.
Closing your project and data retention (Docs)Limitations and support
When using these cloud services, there are important factors to consider, including current limitations and ongoing improvements. We recommend reviewing these details to ensure the best experience. This workflow is flexible and can be adapted to meet a variety of research needs. Before planning data storage or transfer, feel free to contact our Service Desk. Our experts can help you identify the best solution for your specific case.
Limitations in SD Connect (Docs) Limitations in SD Desktop (Docs) CSC Service DeskImages: CSC, Google Fonts